Send Make.com Error Notifications to Slack Channel
Learn how to set up Make.com Slack alerts with this easy guide. Follow this step-by-step instructions to keep your team informed and efficient.
30 Aug 2024
Automation
8 mins
As a software guy, I used to have all critical alerts in one place (except on-duty messaging) in Slack. And you, too, probably want to stay on top of essential messages without constantly checking your email (I do it twice daily). And if you work with Make.com, you know that its alerting is, well… not the best. The only way to get information when your scenario is failing or has just stopped is to get an email notification. And if you are on a Pro plan or lower, you can get it only for one email inbox. You can always redirect it to the group or others, but let's be honest: we don't want this in our inboxes.
Well… let's move it to Slack then!
Also, watch the video tutorial — Automate Your Error Alerts: From Make.com to Slack (Step-by-Step)
Step 1: Trigger Make.com scenario on Custom mailhook
Start by creating a new scenario on Make.com (or if you don't have an account yet, create one with my affiliate link).
Remember to give the scenario an explicit name.
Click on the trigger module in the middle of the workspace.
Search for Webhooks.
Select
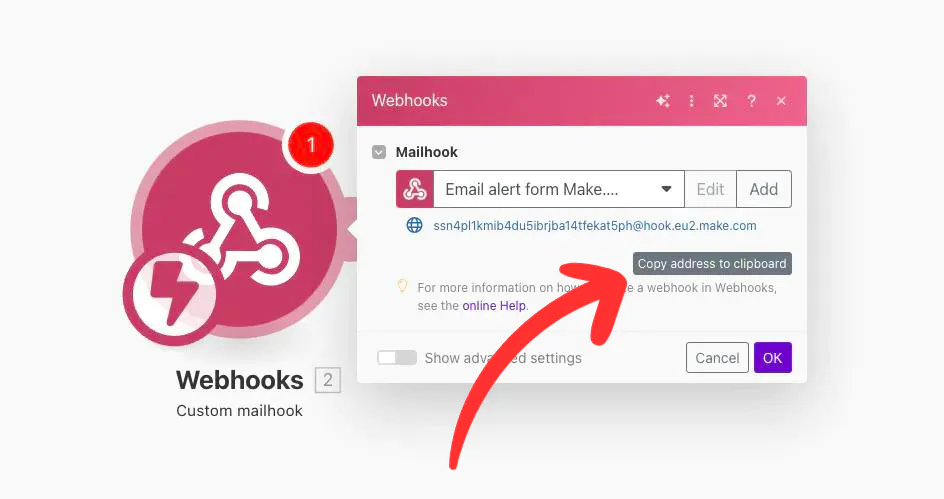
Custom mailhook.Click
Create a webhook(yeah, the name is a bit confusing here).Input the name for you mailhook and
Save.Click on
Copy address to clipboard.
Before the next step, Start the scenario. (This is a crucial step to verify the forwarding address in Gmail).
Step 2: Forward all Make.com alerts to your mailhook
Part I: Add a forwarding address to your Gmail account

Login to your Gmail account.
Go to settings -> Click on the
Gearicon at the top right of the page and thenSee all settings.From the top menu, select
Forwarding and POP/IMAP.Click on
Add a forwarding addressbutton.Paste the email you've just copied from the Make.com mailhook and click
Next.Follow Google instructions.
Open your scenario in Make.com. In the payload of the mailhook, you will find a link to confirm your address.
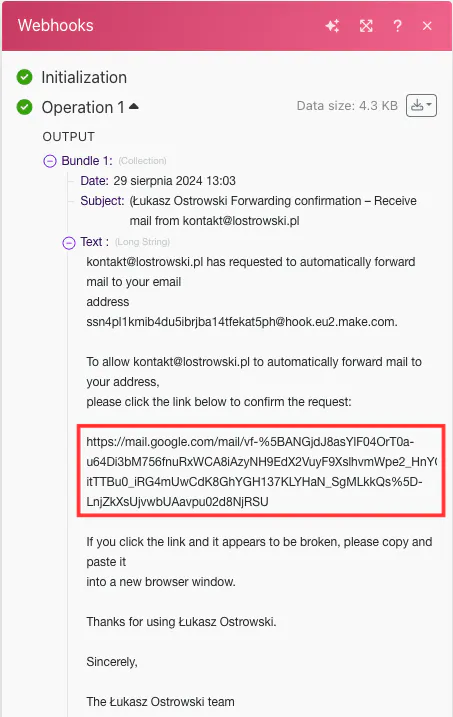
Copy it and open it in a browser to finish the verification.
Double-check that your mailhook email is visible as a verified forwarding email in Gmail settings.
Part II: Create a forwarding filter
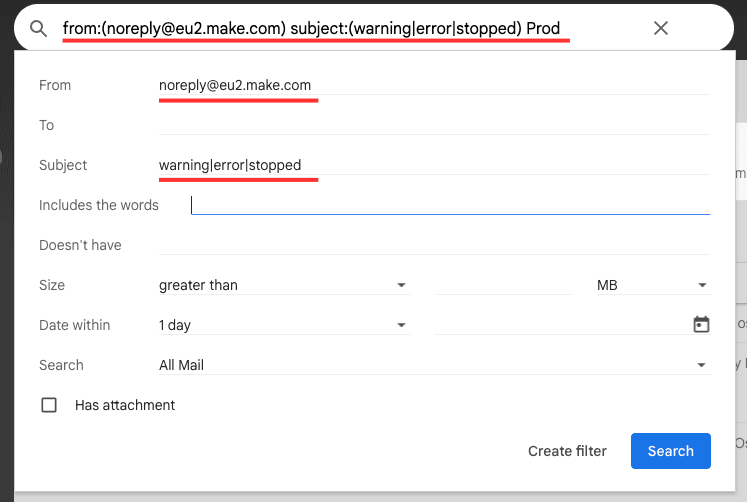
Go to Gmail's main page.
Click on the gear icon at the right of the search box.
Add the following filters:
From:noreply@eu2.make.com(check the Make.com notifications email, it might be different for different regions)
Subject:warning|error|stopped
Or you can put it directly in the search input:from:(noreply@eu2.make.com) subject:(warning|error|stopped)Click
Create filterat the bottom of the form.Check
Forward it to:checkbox and select your Make.com mailhook email from a dropdown next to it.
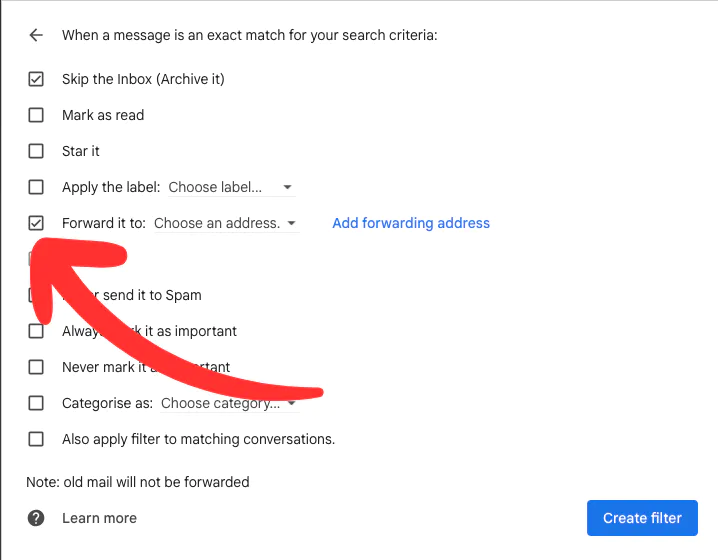
Finally, click on Create filter
You can add other options too; just make sure you forward it to Make.com mailhook.
Step 3: Extract all the information from the email
Let's get back to the Make.com interface with our scenario.
Now, we need to extract all the information we want to post later on Slack from the email. There are many ways to do this. I chose the "lazy" path and used OpenAI GPT.
Part I: OpenAI Module
Add a new module next to the Webhook trigger. Search for OpenAI and then select Create a Completion.
For this tutorial, I assume you have already created a connection.
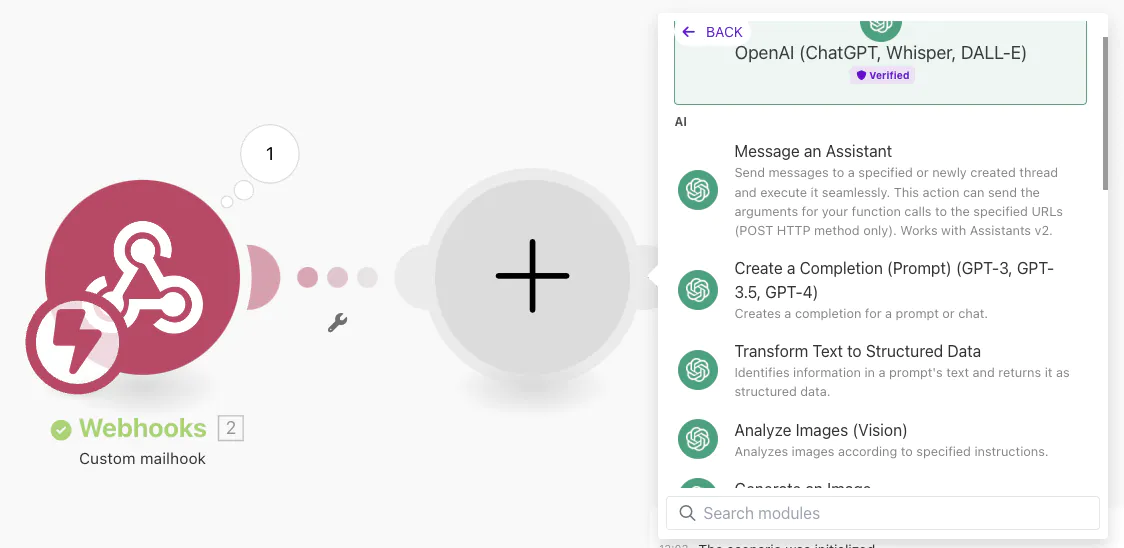
Select Model: GPT-4o: gpt-4o-mini (system) (good enough for our needs and the cheapest one, at least when I write this tutorial).
-> Add message
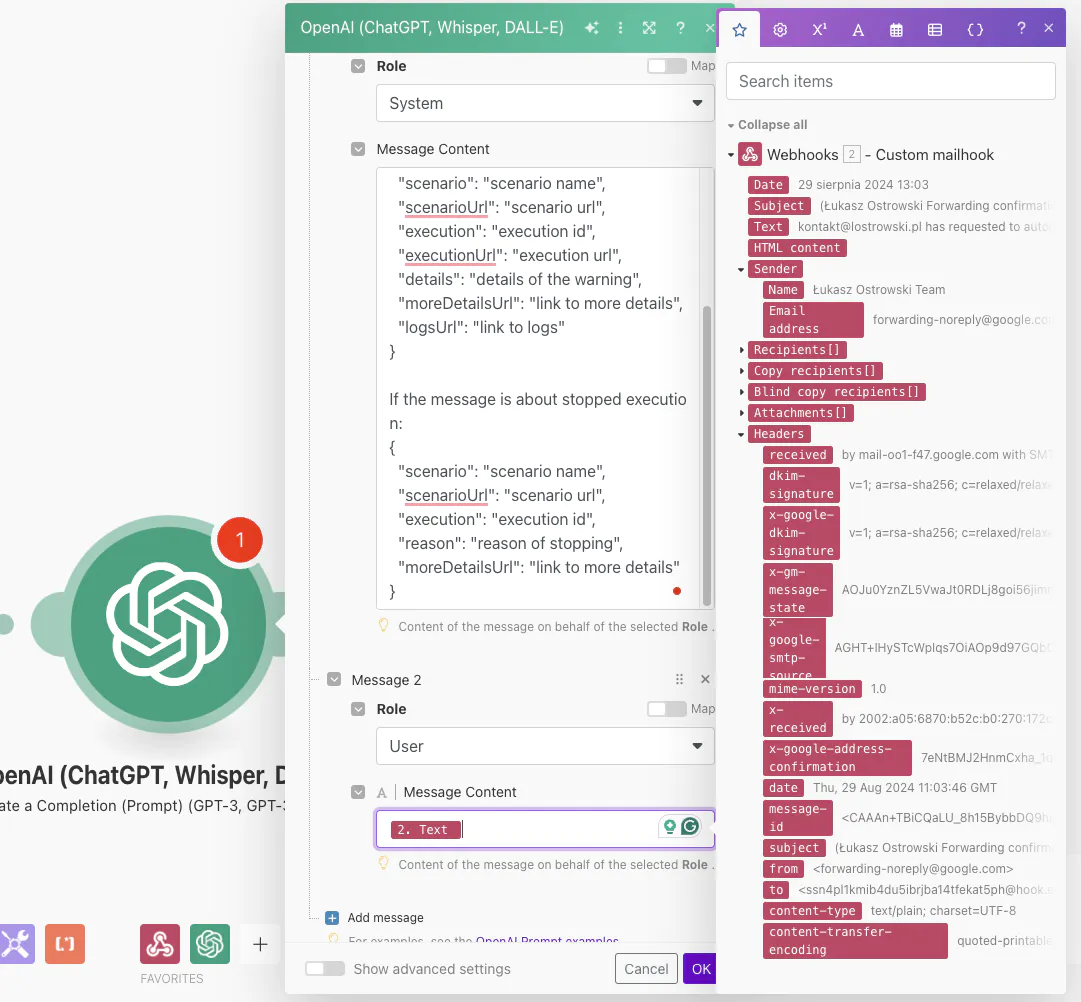
Role: System (I explain roles here)
Message Content:
The messages for warning and error are similar, but the messages for stopped execution differ. That's why I use two schemas.
-> Add message
Role: User
Message Content: Text field from webhook.
Max Tokens: 1500
Temperature: 0.65
Response Format: JSON Object(Using this option ensures that the output will always be in JSON, which allows us to easily parse it in the next step.)
Click OK to save the OpenAI module config.
Part II: Parse JSON
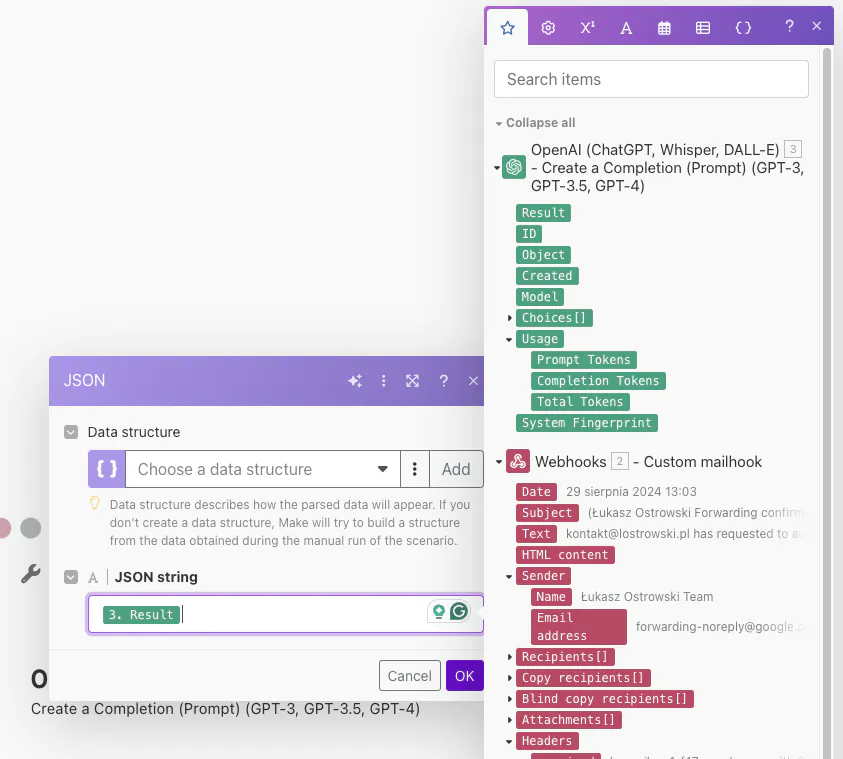
Add a new module next to OpenAI. Search for JSON and then select Parse JSON. Copy one of the JSON objects we use in OpenAI prompt, paste it in Sample data and click Generate. In the generated structure, add a missing field from the second object.
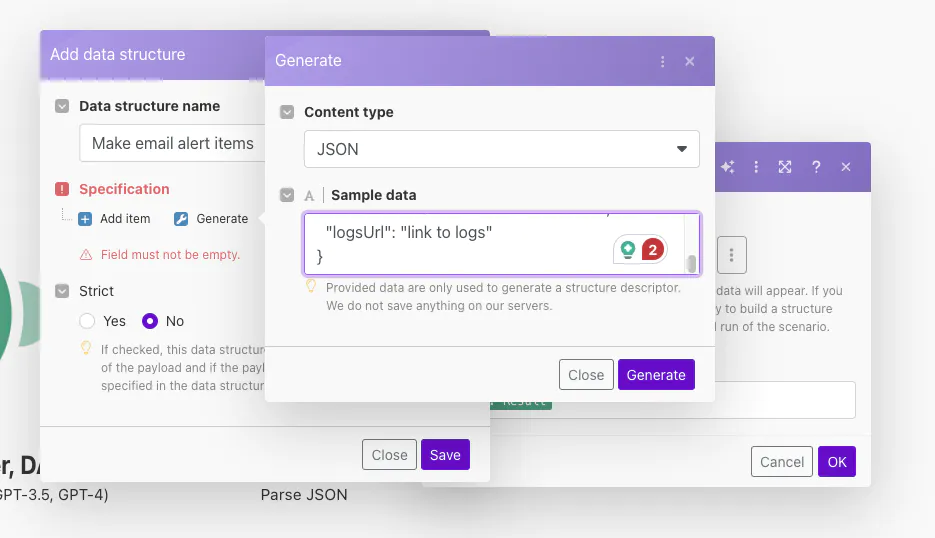
While adding the structure is not required, it makes life much easier.
Click on Create a data structure. And then, in the Specification section, use Generate the option.
JSON String: Result from OpenAI module output.
Save with the OK button.
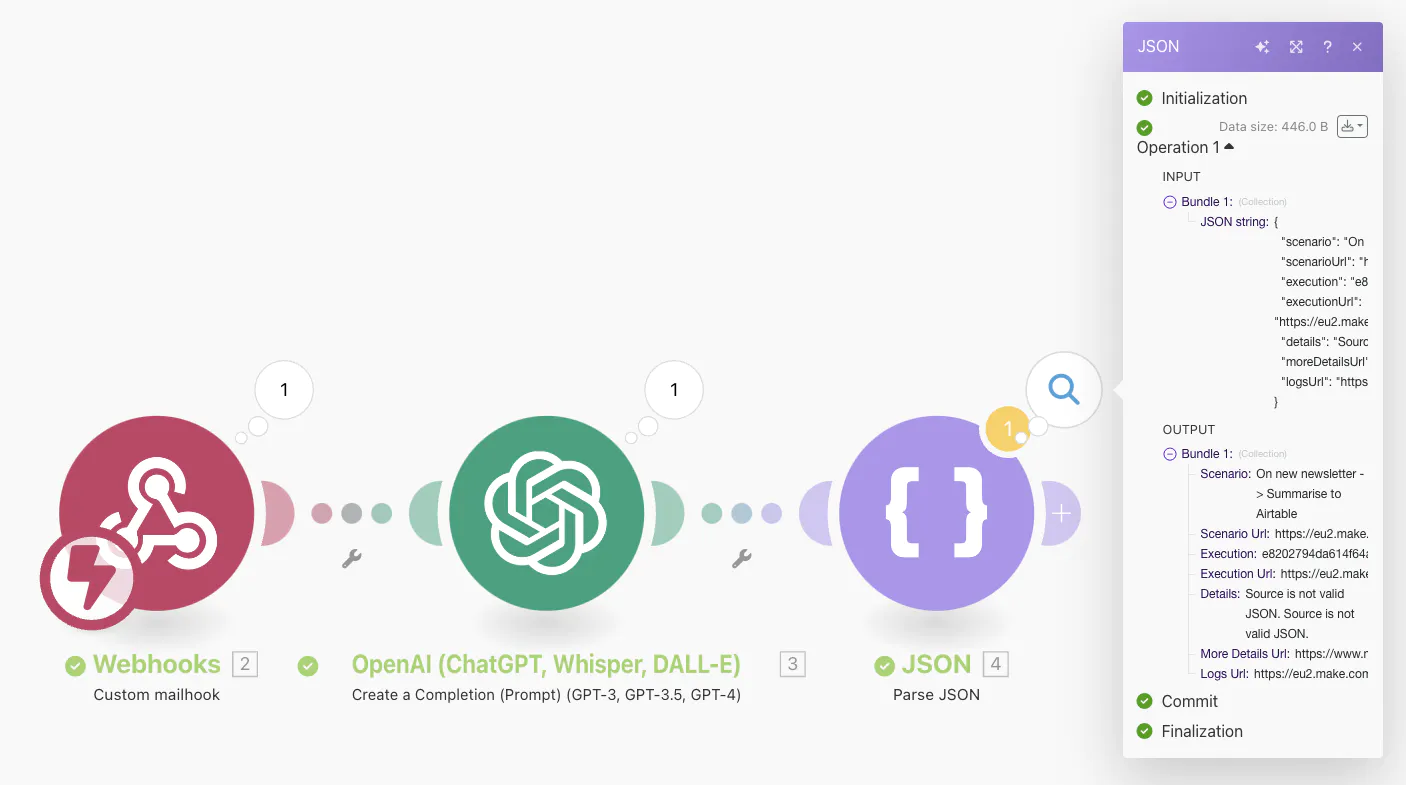
Step 3.1: Test the scenario (optional)
If you follow my instructions strictly, you can skip this step. But it's always good to test early.
Let's test it, then.
Start the scenario by clicking on Run once button.
Copy your mailhook email address (you can find it by clicking on the first module in the scenario).
Go to your Gmail, find any alert from Make.com, and forward it to the address you just copied.
Step 4: Transform Scenario name
Sometimes, Scenario field containing the scenario name can have some special characters, which might cause issues when sending a Slack message.
There is one simple trick we can do to avoid that.
After the Parse JSON module add a new JSON module, but this time, select Transform to JSON. As the object, insert the Scenario field from the previous step.
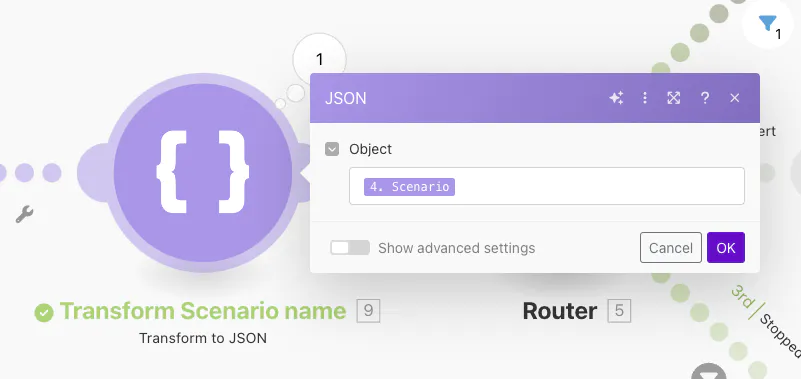
This module will escape all special characters that might break Slack messages.
Step 5: Send them the right way - Make.com Router
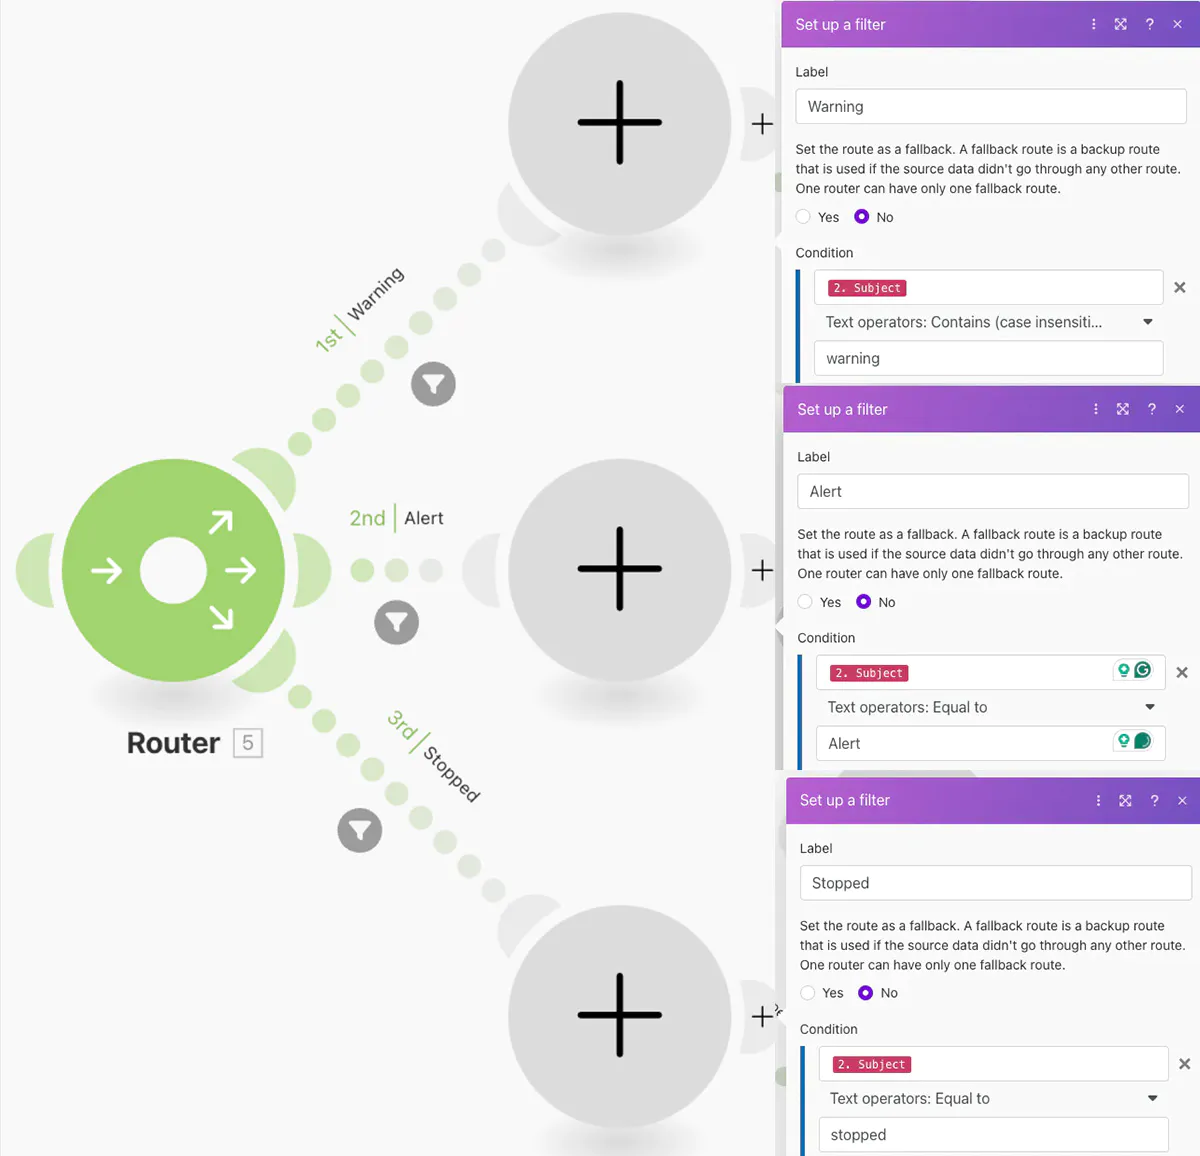
Next to the Transform to JSON module, add a new one. Search for Flow control and select Router.
Add three paths to the Router (just click on the router).
Click on each path and set up filters as follows:
Warning
Label: Warning
Condition: Mailhook subject
Text operators: Contains (case insensitive) -> warning
Alert
Label: Alert
Condition: Mailhook subject
Text operators: Contains (case insensitive) -> error
Stopped
Label: Stopped
Condition: Mailhook subject
Text operators: Contains (case insensitive) -> stopped
Step 6: Send Slack notification
There is only one step left (it just needs to be done three times).
Click on the empty module at the end of the `Warning" path (the first grey "+" sign).
Search for Slack and select Create a Message.
For the Slack integration, you have two ways to send a message:
Text- it's just simple text—no fancy formatting etc. However, it's used as a fallback for the second option. I suggest you always put some value on this parameter.Blocks- with this one, you can build a nice-looking interactive message. This field requires you to send a JSON message with all blocks. You can use the Slack Block Kit Builder to build or test your message structure.
As I suggest, we will use both.
Start by selecting a channel to which you want to send your messages. I usually create a separate channel only for alerts.
Then, for Text the field, put Subiect from the mailhook.
Finally, build and put a JSON into Blocks — you can play a bit with this one. Just remember to replace all test text with values extracted from the email.
You can build blocks by yourself, or you can start with my example:
Repeat for Alert and Warning paths.
Free Blueprint
Get a free blueprint for this automation: Make.com Error Notifications from Slack Blueprint.
Conclusion
Just before you go, ensure you tested all three scenarios and confirm all work as expected.
And that's all.
This scenario saved me a lot of frustration for myself and my customers. I think it was worth spending these 20 minutes building and testing it.
What about you? How do you monitor your scenarios?
Reach out to me on X @OstrowskiLukasz or send me an email.
